August heat hit and along with the insufferable weather, a variety of life interruptions and responsibilities put our creative pursuits on hold. Jan and I haven't been seriously at work for a month and the place looks like an archeological site, all those bright beads buried under layers and layers of dust.  A few small endeavors while on summer sabbatical. Finished the Mary Retablo with a background of black smalti.
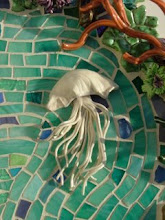
 Took this little fellow out of the kiln.
 And a funny looking chili pepper...
 Now in the process of being covered with beads and glass.
  Made a bit of progress on the outside atrium wall.
 And since I couldn't be in the studio while putting new hardwood floors in the house, I brought the studio with me. A new window box valance. Have shards will travel.
A few small endeavors while on summer sabbatical. Finished the Mary Retablo with a background of black smalti.Took this little fellow out of the kiln.And a funny looking chili pepper...Now in the process of being covered with beads and glass. Made a bit of progress on the outside atrium wall.And since I couldn't be in the studio while putting new hardwood floors in the house, I brought the studio with me. A new window box valance. Have shards will travel.


 After these are fired, they will require a clear glaze to be painted over the entire tile and then re- fired to Cone 05. We have no idea how they will really look until the moment we lift the lid. That's the exciting part of ceramics, opening the kiln and seeing what happened during the second firing!
 A few 3-D hand sculpted tiles loaded in the kiln and ready for bisque 04 firing. The fish tile and the frog on the lily pad are made with slip glazes, which we've been exposed to for the first time in our sculpture class--something new for us, painting with colored clay. Lots of experimenting in progress. In order to appear shiny after bisque firing, these tiles will require a clear glaze and a second firing at Cone 05 or Cone 5, depending on the initial glaze used.

 Here she is instructing a student in the fine art of using a hammer and hardie to chip the tiny smalti glass pieces. Takes some getting used to. Laurel, as always, is a dynamite instructor (wonderful spirit and lots of laughs) and a fabulous artist. Just getting to see what she's up to is worth the trip alone!
 Master bedroom and bath freshly painted,

 along with new TV chest.


 Dusted off the fairy mirror I started for her birthday last year (and never finished to my satisfaction), and gave it a quick face lift by adding a ceramic bow, butterfly and a few other little pieces. Hurray, check that off the unfinished projects list.
 This year's birthday challenge makes the fairy mirror look like a piece of cake.
 Will this overly ambitious mosaicing mom be able to pull it off in time? Pressure's on!
 Only a few things left to do in the next two days. Like paint her bedroom and bathroom a soft mint green--I do the trim work and edges, Ramon rolls the walls. Put the new ceramic handles on her chest of drawers that her father so kindly painted white for me last weekend.
  Finish mosacing the little panels on the chest her TV will sit on, and grout it. A
 nd last but not least, grout and give a final coat of paint to her new queen sized pique assiette headboard; iron the bed ruffle and linens and put it all together before she walks in the door.
  Whew! Where's the room makeover team from HGTV when you need them?
  Marisa will be thrilled to see that I snuck in her little white ceramic kitty.
 When it got broken, I promised her, not too worry, I'd recycle it for her one day. Voila!
 Can you imagine how fun it will be to grout this? --Julie
 One of our many larger than life projects around the studio is the outside wall to our garden atruim. This is an area that generally gets worked on when one is tired of other projects and decides to go outside and throw a few tiles up, so progress is slow. What makes it an enjoyable enterprise however, is getting to mosaic in an "everything but the kitchen sink" fashion, with an eye towards predominately woodsy colors. Working on this wall can be happily attended to without too much forethought.
 The wall which runs perpendicular to this one, (sneak peek above) is a formal mural of a tropical nature. Stay posted for updates on that endeavor...
 Why not? Words and sayings add visual interest and inspiration, and are easy to create using the endless variety of alphabet stamps on the market. We have found the ones that work the best in clay are sold at Michaels and are marketed as stamps for concrete. They are made of hard blue plastic and can be pressed deep into the clay. Concrete alphabet stamps show up in ceramic tiles particularly well no matter what glaze you are using. Here are examples of the concrete alphabet stamps used in tiles which replicate the word groupings used in stepping stones originally created by Frank Lloyd Wright.
 Rubber stamps are also functional, but typically more successful in polymer clay. In ceramic clay, the text is not always readily apparent because the stamp is more superficial in nature. Examples of rubber alphabet stamps in clay can be seen below in this box of tiles. Tiles read: Dreamspace and A Work of Art.
 Not wanting to give up on all our lovely rubber stamps, we discovered a way to deal with this problem by first rubbing black glaze into the bisqued tile words and then wiping off any of the excess glaze on the surface of the tile, and then coming back and glazing the whole tile with a solid color.
 Here is an example of this technique using a small rubber stamp, where the text has been high-lighting with black glaze: the first stanza of the W. B. Yeats poem, Lake Isle of Innisfree. Much more readable.


 So, when you broke one of your beautiful hand-painted dishes from Taladura, Mexico, inspiration for your birthday gift this year was a piece of cake. Now you will be able to set your table with a matching centerpiece.

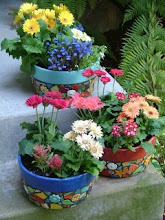
 Finished pot made to complement Geri's blue and white mosaic garden table. --Jan


 ...On the table, ready for silent auction...sold for $100! Yipee!! --Julie


